 I get a lot of questions about which products I use, so I’m adding a new blog category where I can share some product reviews. Many of the products I am writing about are ones I actually use and can recommend. If I have reservations about a product, rest assured I will tell you.
First, a Word About Twisted Throttle
Many of the products are available through Twisted Throttle. This is because I have a special relationship with the company, so I get an nice discount (No, I can’t get YOU that discount, yeesh). Understand that I don’t use crappy products, even if they are discounted! Thankfully Twisted Throttle sells some of the best, highest quality motorcycle products around.
 If you choose to buy any product from Twisted (not just ones I feature), please buy from their site through the links in this post, from the ads in the sidebar, or by clicking on the product images at the bottom of this post. That way you help support Riding in the Zone. You don’t have to do anything more; just click and shop as you normally would. Much Appreciated!
Product Review: MRA X-creen Add-on Spoiler Blade
The MRA X-creen (yep, it’s spelled without an “s”) is a spoiler blade that either clamps or bolts onto your existing windscreen. I bought the MRA for additional wind protection on my Sprint RS street bike, but soon figured out that it works great clamped to the flyscreen of my Triumph Street Triple track bike. I can adjust it upward for colder days and when my neck gets tired from windblast. I can also move it downward for maximum airflow on warm days.
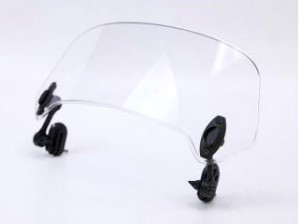
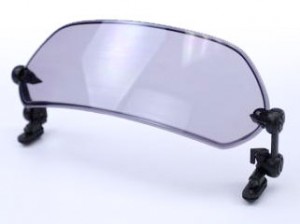
The X-creen comes in two sizes, the smaller Sport version and the taller and wider Tour version. The larger Tour model comes specifically with either clamps or bolt-on hardware. Both models are available in clear or smoke. I have the clear version for my Sprint RS and smoke for my Street Triple.
Installing the X-creen
Option 1: Clamp-on, Clamp-off
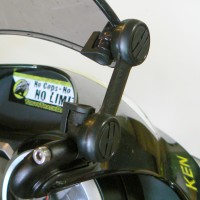
Assembling the adjustment mechanism to the spoiler blade is pretty easy. You have to first decide whether you want to use the clamps (this is what I use) or use the bolt-on hardware for a permanent installation. The clamp-on version allows you to move the blade from one bike to another. The clamp hardware is really nicely made and utilizes rubber inserts that will not scratch your windscreen (or paint in the case of my Street Triple’s flyscreen).
Assembling the clamps involves placing the pivoting locking mechanism in the ends of the adjustment arms. This takes only a few minutes.
No, the clamp-on version will not go flying off as soon as you hit highway speeds. As a matter of fact, I’ve done 130 mph (on the racetrack of course) and the blade stayed securely in place. See the video below for proof!
General Installation Instructions can be found HERE.
Option 2: Drill Baby, Drill!
If you choose to bolt the blade on permanently, you’ve got more work to do. Specifically, you’ll have to drill two holes in your existing windscreen. The kit comes with a template for locating the holes. If this makes you queasy, Twisted Throttle sells MRA replacement windscreens with the X-creen already bolted on for specific bikes. Even though replacement screens cost a bit more, some people may feel better having MRA do the drilling and installing at the factory.
Installation instructions for drilling can be found HERE.
If you decide later to use the X-creen on a different bike, but don’t want to drill any holes, you can convert a bolt-on screen to a clamp on screen using a special conversion hardware kit. Note that this is for the TOUR version only. The SPORT version comes with both clamp-on and bolt-on hardware.
Four videos on how to install the X-creen can be found on the Twisted Throttle Product Page.
How Does it Look?
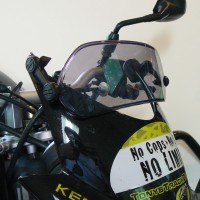
The X-creen is unobtrusive, and dare I say, I think it’s even attractive, especially on the Sprint RS where it fits nicely on the stock screen and isn’t out of place on this sport touring bike.
On the Street Triple, it is a bit less graceful looking, but I think it looks as good or even better than many other windscreen options, including the Triumph factory flyscreen visor kit, which requires you to drill the flyscreen (Yuck), almost completely covers it over (why did I buy a flyscreen to begin with?), and doesn’t add very much wind protection. Oh, and it’s kinda spendy.
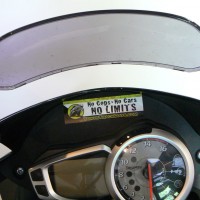
But, judge for yourself. Here are some photos of the MRA X-creen on a Ducati Multistrada, my Triumph Sprint RS, and my Triumph Street Triple R.


Adjusting the X-creen
Adjusting the screen when it’s new requires some rough handling…sort of like when you replace face shields on Arai helmets: you feel like you’re going to break the ratcheting mechanism, but it’s okay…that’s just the way it is. Thankfully, after a bit of use, the mechanism loosens up and I can now adjust the screens while sitting on the bike (not while moving of course). All you do is turn the teardrop-shaped locks until they are pointed sideways and grab both sides of the screen and rotate into the position you want. The adjustability is almost infinite.
How Does It Work?
Once positioned, rotate the locks and the screen won’t move. Trust me! I’ve been using the X-creen on the racetrack all season and it doesn’t move even at 130mph! See the X-creen in action in the video below.
As far as wind noise goes, The Sport version seems to be perfect for the Sprint. I do notice a bit more wind noise with the blade set vertically, but simply tipping it back a bit makes any wind noise go away. I’ve never felt any buffeting, at all. The fact is that the X-creen is so easy to adjust and has almost infinite positions that if I ever had excessive noise or buffeting, I’d simply try a slightly different position. I love having that versatility.
So, there you have it. The MRA Sport X-creen is a great accessory that offers a tone of versatility to you touring, sport touring, adventure or sport bike. It retails for $114.99 from Twisted Throttle.
Let me know what your opinion is of this product. And ask me any questions you have about the X-creen by posting in the comment section below. I’ll reply so everyone can benefit.
Please Donate to Keep the Articles Coming
If you liked this article and the many other articles on this site, please toss a buck or five into the hat. It’s greatly appreciated!
- Click the PayPal “Pay Now” button.
- Then indicate quantity in $2.00 increments. – Example: put “2” in “QUANTITY” field to donate $4.00, “3” for a $6.00 donation, etc.
Why $2.00? Due to the PayPal fee structure, a $2.00 donation is significantly more beneficial compared to a $1.00 donation.
Thank You!


